Mazda 6 Service Manual: Front oil seal
FRONT OIL SEAL REPLACEMENT
1. Disconnect the negative battery cable.
2. Remove the spark plugs. (See SPARK PLUG REMOVAL/INSTALLATION.)
3. Remove the Cylinder head cover. (See Cylinder Head Cover Installation Note.)
4. Remove the drive belt. (See DRIVE BELT REPLACEMENT.)
5. Remove the front drive shaft (RH) from the joint shaft. (See DRIVE SHAFT REMOVAL/INSTALLATION.)
6. Remove the CKPsensor.(See CRANKSHAFT POSITION (CKP) SENSOR REMOVAL/INSTALLATION.)
7. Remove in the order indicated in the table.
8. Install in the reverse order of removal.


Crankshaft Pulley Lock Bolt Removal Note
1. Remove the cylinder block lower blind plug.

2. Install the SST
.
3. Turn the crankshaft clockwise the crankshaft is in the No.1 cylinder TDC position.
4. Hold the crankshaft pulley by using the SSTs
.

Front Oil Seal Removal Note
1. Cut the oil seal lip using a razor knife.

2. Remove the oil seal using a screwdriver protected with a rag.
Front Oil Seal Installation Note
1. Apply clean engine oil to the oil seal lip.
2. Push the oil seal slightly in by hand.
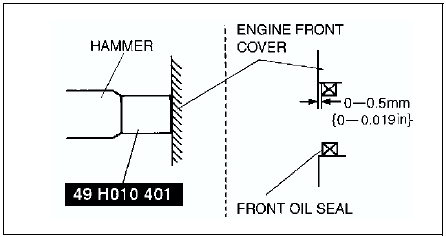
3. Tap the oil seal in evenly using the SST
and a hammer.

Crankshaft Pulley Lock Bolt Installation Note
1. Install the SST
to the camshaft as shown.
European countries

Except European countries

2. Install the M6 x 1.0 bolt
in by hand.

3. Turn the crankshaft clockwise the crankshaft is in the No.1 cylinder TDC position.
4. Hold the crankshaft pulley by using the SSTs
.

5. Tighten the crankshaft pulley lock bolt in the order shown using the following two steps.
(1) Tighten to 96-104 N·m {9.8-10.6 kgf·m, 70.9-76.7 ft·lbf}
(2) Tighten 87°-93°
6. Remove the M6 x 1.0 bolt.
7. Remove the SST
from the camshaft.
8. Remove the SST
from the cylinder block lower blind plug.
9. Rotate the crankshaft clockwise two turns until the TDC position.
- If not aligned, loosen the crankshaft pulley lock bolt and repeat from Step 1.
10. Install the cylinder block lower blind plug.
Tightening torque: 18-22 N·m {1.9-2.2 kgf·m, 13.3-16.2 ft·lbf}

 Cylinder head gasket
CYLINDER HEAD GASKET REPLACEMENT
Warning
Fuel vapor is hazardous. It can very easily ignite, causing
serious injury and damage. Always keep sparks and flames away from fuel.
Fuel line spills ...
 Rear oil seal
REAR OIL SEAL REPLACEMENT
1. Remove the flywheel. (MTX) (See CLUTCH UNIT REMOVAL/INSTALLATION)
2. Remove the drive plate. (ATX) (See DRIVE PLATE REMOVAL/INSTALLATION)
3. Remove in the order indicat ...
Other materials:
Mazda 6 Service Manual: Mazda Importer/Distributors
U.S.A.
Mazda North American Operations
7755 Irvine Center Drive
Irvine, CA 92618-2922 U.S.A.
P.O. Box 19734
Irvine, CA 92623-9734 U.S.A.
TEL: 1 (800) 222-5500 (in U.S.A.)
(949) 727-1990 (outside U.S.A.)
CANADA
Mazda Canada Inc.
55 Vogell Road, Richmond Hill, Ontario, L4B 3K5 Canada
TEL: 1 ...
Mazda 6 Service Manual: A/c unit removal/installation
1. Disconnect the negative battery cable.
2. Discharge the refrigerant from the system. (See RECOVERY.) (See CHARGING.)
3. Drain the engine coolant. (See ENGINE COOLANT REPLACEMENT.)
4. Remove the dashboard. (See DASHBOARD REMOVAL/INSTALLATION.)
5. Remove the theft-deterrent control module. (See ...